.png.2a7a40735e452382f4f5d29ce64eb4b9.png)
wowzewow
-
Posts
490 -
Joined
-
Last visited
Content Type
Profiles
Forums
Events
Gallery
Everything posted by wowzewow
-
look i don't know why everyone's mad at me right now but here's the discord convo between me and BRAINOS i hope this clears things up

-
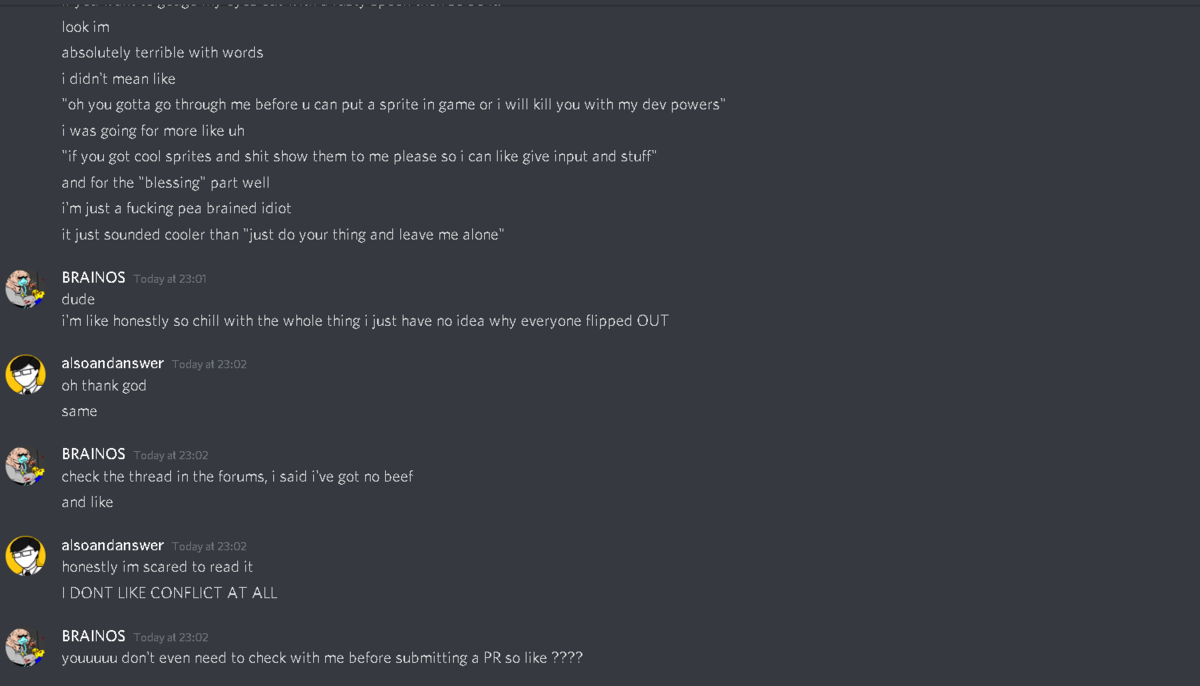
Well, I'd like to explain my thought process on this resprite, and I'd like to explain a few things. 1. There very much should've been a feedback thread, but it's already merged so I'll keep that in mind for the future. (also no idea Resi was working on this either) 2. Visual clarity, I.E, does it look like what it's supposed to do? / Ease of Gameplay For starters, the color. It's purple on white. Science colors. It looks like it belongs in Science, not Medical. To illustrate, which one of these is not like the other? Yeah, the hypospray. (yeah, but what about Zeng-hu? Fine, whatever. There can be a purple motif, but it can't take up more like 50% of the color. Right now if you've stripped literally everything with the description and name it literally looks like a gun SCIENCE could pull out of the protolathe!) Let's jump into the shoes of CargoTech McBaldie. He's sorting out crates and he takes one look at it. "Oh, it's purple! It's clearly science stuff." "GEE, I WONDER WHICH DEPARTMENT THIS BELONGS TO." That's what I'm trying to avoid here. I mean, not everyone has sunk a 100 hours playing medical and know every surgical tool and chem like the back of their hand. I know, because I have. Visual consistency ( Looking in line with everyone else ) Look, I didn't pull out this design out of my ass. I'm trying to make the tools look visually similar together. 3. The words Literally the description states, "Air-needle", I.E, there's no needle. It uses AIR to inject the stuff. And there's a needle on it. The literal reason why we're using hyposprays is to avoid the filthy needle cross-contamination and having to use a new syringe every time. 4. Foreword Look, I'm willing to compromise here, hell, add a purple light-up attachment or something. Because I will definitely not approve a full revert.
-
oh this could be p. simple just re-use the soda can shake sound
-
Got the sleep paralysis demon last night. Was late.
because I literally could not move out of bed
-

I had sleep paralysis like. 3 days ago. It was p. spooky, but I had no demon thankfully.
The spooky thing was something completely separate, instead of a pressure on my chest it was on my forehead, and the bad vibe:tm: pulsed. There was a pitch I could hear and it pulsed alongside the bad vibe:tm:
The pitch adjusted tone like.-------------_____-----------____-----------____------- And each time it swapped tone the feeling of dread kinda intensified. Tho it was static depending on how low pitch the tone was. So, when it was -------- It was only kinda uncomfortable, when it became _____ it became Really uncomfortable.
-
.thumb.png.b1ceb31a90116a77dd68593b551380db.png)
-
-
In real life, we have mechanical gun safeties in place to stop misfires. And there's a very real second safety installed on every gun. It's called trigger discipline. In this case, help intent.
-
The words "off-duty" and "actual job" do not go together. at all. also this could be extremely annoying very fast, what with conflicts with job slots and whatnot. honestly, too much code for what is basically people who wanna play visitor but can't be arsed to go to HOP and get back to work.
-
i retract my thanks
-
Thanks for hearing me out, @Zundy
-
Alright. However, this won't be an easy add, though. Probably need to make a few more sprite changes too to make a substantial pull request. Because these are, like one or two things. However, if they were like, in a set or something, like a resprite of dominia coats in general, then it would be accepted. I'm not doing this because of any personal bias here, I've tried porting stuff from Bay and Eris myself, and I've ended up doing some more work myself, because it doesn't look very good to hodgepodge different skill levels and artstyles. basically what i'm saying is that by themselves it's going to be a little hard to add them, however if like there was a few more it'd be easier. so it wouldn't be a case of "that one good dominia coat and suit" but instead implementing "a cool set of new dominia clothing" if you catch my drift.
-
yeah, it's gonna look kinda bad when like we have a really sparkly shining coat and then like all our other stuff is just okay people are going to go like "wow these guys are real dumb why dont they make everything like this awesome coat"
-
alright, personally, they look great, but zundy, unless you get your friend to sprite for us or something, i don't think any of us will be able to "match" this level. it's going to stick out, like none of us can replicate it.
-
where the hell did you get these sprites dude
-
honestly i feel like this will just create some new RP problems with a smaller station, everyone's kinda forced to roleplay with eachother, because they have to do their jobs, and more interaction leads to more fun character moments. however, the more fuck-off large you make the station, the easier it is to just find a bunch of friends to clique together and find out some hole to RP together with. and at that point, why the fuck do you even play the game anymore? like, as a civilian, you're not going to do work anyway nor seek out anything interesting without good reason, and it's going to be just a glorified chatroom. Just go make a private discord channel and let your imagination do the work. -1
-
-
GODDAMMIT HOW COME EVERYTIME US CHINESE PUT UP A WALL STUPID MONGOLIANS HAVE TO COME AND KNOCK IT DOWN
-
Yeah but I still feel it is unfair. If there is a more appropriate place to post this, please direct me
-
Yeah, we definitely need some SERIOUS quality control on MUTE SECURITY GUARDS and STUTTERING PARAMEDICS. nanotrasen wouldn't realistically be hiring this much trauma affected employees without good reason
-
inb4 custom items gets expanded to custom disfigurements, traumas and the like
-
BYOND Key: Wowzewow Staff BYOND Key: ShesTrying Game ID: N/A Reason for complaint: Unfair punishment to ForAFriend Evidence/logs/etc: Additional remarks: I'm writing this because it's not allowed to add responses without being either a mod, admin, a witness or the OP. So I'm writing this now. The destruction of Beepsky (After very clear provocation, mind you) I feel is perfectly sensible and not out-of-character. It's misinterpretation of rules "Characters must be believable, and well-rounded." and "Criminal characters are allowed, if they are done in a believable fashion whilst non-antagonists." Vandalism, provoked by pain. This is a thing that should only have OOC consequences if it is a repeated issue. As of such, it should be dealt with ICly, and relayed to CCIAA accordingly instead of personally handing out a note to the player. This sets a bad precedent, as people will fear OOC consequences for doing IC things, which should never happen as it greatly encourages meta-gameplay.
-
ass-less tactical chaps when
-
Holy shit, it fits into their lizard physiology with the lower metabolism thing. Space is cold, like a 20C cold. You may think, "meh, it's not that bad" but realize that Moghes is a hot $%^& planet they call their home, and you know... something something cold blooded slower medicine metabolism